
For most molecular biologists, the “miniprep” is a daily ritual performed almost reflexively. The workflow is deeply ingrained: pellet the bacteria, resuspend, lyse, neutralize, centrifuge, and—seemingly effortlessly—plasmid DNA emerges. Whether you are an undergraduate learning basic techniques or a seasoned investigator troubleshooting a cloning strategy, this procedure is arguably the most frequently performed protocol in biotechnology’s history.
However, the convenience of modern commercial kits—from Qiagen, Promega, and numerous other vendors—has cultivated a “black box” mentality. We have learned to treat color-coded bottles as mysterious reagents rather than defined chemical solutions. We trust that “Buffer P2” will perform its function without necessarily understanding the underlying mechanism. This lack of chemical intuition becomes a critical liability when problems arise. When yields unexpectedly plummet, when genomic DNA contaminates a crucial sample, or when a “difficult” plasmid resists purification, treating the protocol as a cookbook recipe rather than a rational chemical process leaves you unable to diagnose and resolve the issue.
The method underlying virtually every kit on the market today is based on the landmark alkaline lysis technique. Developed by Birnboim and Doly in 1979, this elegant approach revolutionized molecular biology by replacing laborious, multi-day cesium chloride (CsCl) density gradient centrifugation with a procedure requiring mere minutes. In this post, we will demystify those proprietary buffer formulations, revealing the precise chemistry occurring in your microcentrifuge tube. By understanding the molecular choreography of lysis and neutralization, you can transition from simply following instructions to mastering the principles behind the perfect prep.
Before mixing any reagents, we must appreciate the central challenge of plasmid purification: it is fundamentally a separation problem. Chemically, plasmid DNA and bacterial chromosomal DNA are virtually indistinguishable—both are nucleic acid polymers with identical charge density and solubility characteristics. How, then, can you isolate a few micrograms of plasmid DNA from the overwhelming mass of chromosomal DNA comprising the bacterial genome?
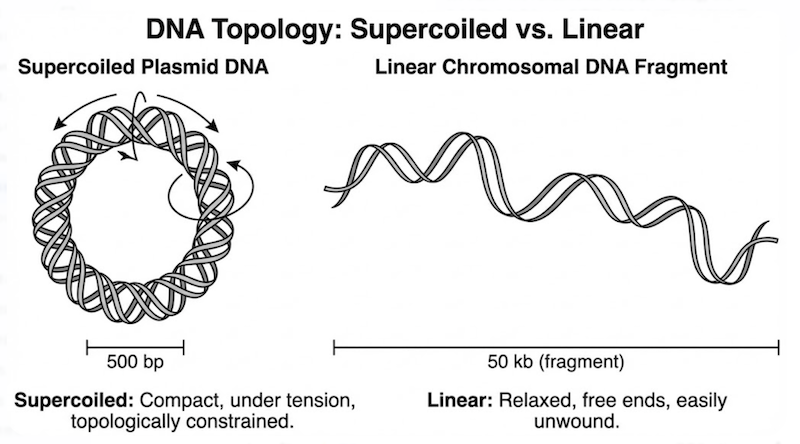
The answer lies not in differential chemistry, but in topology (three-dimensional structure) and size.
Chromosomal DNA: The Fragile Giant
Within the intact bacterium, the chromosome exists as a massive, continuous circular molecule. However, during the mechanical stress of cell lysis, this giant structure is inevitably sheared into linear fragments. While termed “fragments,” these pieces remain enormous compared to plasmids—large, tangled segments of linear DNA. Because they are linear (or contain nicks), the two strands of the double helix can completely unwind under denaturing conditions.
Plasmid DNA: The Supercoiled Survivor
In contrast, plasmids are compact, covalently closed circular molecules existing in a superhelical conformation—twisted upon themselves like a torsionally strained rubber band. Critically, because they possess no free ends, the two DNA strands are topologically constrained; they are physically interlocked and cannot separate without breaking the phosphodiester backbone.
The Strategy: A Controlled Denaturation Trap
The alkaline lysis strategy employs a “controlled denaturation” approach for cellular disruption. Rather than gently extracting the plasmid, we dramatically alter the chemical environment to denature all macromolecules within the cell. By raising the pH to extreme alkaline conditions, we disrupt the hydrogen bonds maintaining the DNA double helix.
Chromosomal DNA: The linear strands separate completely and drift apart into solution.
Plasmid DNA: The strands denature, but because they remain topologically intertwined, they are held in close proximity, unable to dissociate.
The critical step follows: rapid neutralization. This is the trap. The small, interlocked plasmid strands instantly “snap back” together, rapidly reannealing to reform their native supercoiled structure. The massive, separated chromosomal strands, however, cannot efficiently locate their complementary partners in the turbulent renaturating environment. Instead, they aggregate randomly with denatured proteins and cell wall debris, forming a tangled, insoluble complex. Centrifugation pellets this “chemical precipitate,” leaving the soluble, properly renatured supercoiled plasmids in solution.
Here’s a polished rewrite of Step 1:
Step 1: Resuspension (Buffer P1 / Solution I) – Setting the Stage
The first step of the protocol appears deceptively straightforward: resuspending the bacterial pellet. Whether using a commercial “Buffer P1” or homemade “Solution I,” the objective is achieving complete dispersion of bacteria into a homogeneous suspension. Incomplete resuspension—leaving visible clumps—is a critical failure point. Lysis reagents added in Step 2 cannot penetrate aggregated cells, resulting in poor yields and contaminated DNA.
However, this buffer is far more than isotonic saline. It contains a precisely formulated mixture of reagents—typically Tris-Cl, EDTA, and RNase A—designed to prepare the bacterial cell for controlled disruption.
The Chemistry of EDTA
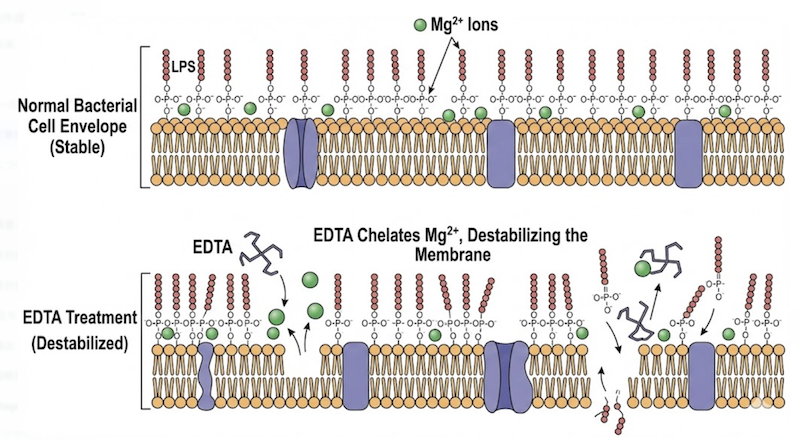
The key component in this buffer is EDTA (ethylenediaminetetraacetic acid), a powerful chelating agent that sequesters divalent cations, particularly magnesium (Mg²⁺) and calcium (Ca²⁺). This chelation serves two distinct and essential functions:
1. Destabilization of the Cell Envelope: The outer membrane of E. coli is stabilized by divalent cations that cross-link phosphate groups within the lipopolysaccharide (LPS) layer. By sequestering these ions, EDTA disrupts outer membrane integrity, compromising the cell’s structural barrier. This “puncturing” renders bacteria fragile and permeable, ensuring that the detergent (SDS) introduced in Step 2 can immediately access and solubilize the membrane.
2. Nuclease Inactivation: Critically, EDTA functions as a protective mechanism for plasmid DNA. Bacterial cells contain abundant nucleases (such as Endonuclease I) that would rapidly degrade plasmid DNA upon cell lysis. However, most of these enzymes require Mg²⁺ as an essential cofactor for catalytic activity. By chelating all available magnesium, EDTA effectively inactivates these nucleases, creating a protected environment for plasmid release.
The Role of RNase A
Many protocols specify adding RNase A to Buffer P1 and storing at 4°C. Why introduce this enzyme at the initial step? Bacterial cells contain massive quantities of RNA—ribosomal RNA, mRNA, and tRNA—that collectively far exceeds plasmid DNA mass. Without degradation, this RNA co-purifies with plasmid DNA, interfering with spectrophotometric quantification and downstream enzymatic reactions.
RNase A is added at this early stage because of its exceptional stability. This robust enzyme survives the harsh alkaline pH and detergent conditions of subsequent lysis (Step 2), remaining catalytically active to digest RNA into small, soluble fragments that won’t interfere with plasmid purification.
Historical Note: The Glucose Factor
Original protocols and older manuals frequently list glucose as a key Solution I component. Its purpose was maintaining osmotic pressure, preventing premature cell lysis before addition of the lysis buffer. While this was essential for “gentle lysis” techniques required for very large or fragile plasmids, most modern miniprep kits omit glucose. They instead rely on the robust peptidoglycan layer of standard E. coli strains to maintain cell integrity until controlled lysis is initiated, streamlining the overall procedure.
Here’s a polished rewrite of Step 2:
Step 2: Lysis and Denaturation (Buffer P2 / Solution II) – The “Nuclear Option”
If Step 1 was preparatory, Step 2 is cataclysmic. This is the most critical and dramatic moment of the entire protocol. Upon adding “Buffer P2” (or “Solution II”) and gently inverting the tube, the turbid bacterial suspension transforms instantly into a clear, viscous lysate. This isn’t mysterious—it’s the consequence of a precise chemical assault executed by two key components: sodium dodecyl sulfate (SDS) and sodium hydroxide (NaOH).

Action 1: SDS (The Detergent)
SDS is a powerful anionic detergent functioning as a molecular wrecking ball. Its primary target is the cell membrane. SDS aggressively solubilizes the phospholipid bilayers of both inner and outer membranes, rupturing the bacterial cell and releasing its contents into solution.
However, SDS’s effects extend beyond membrane disruption. It simultaneously attacks proteins maintaining cellular architecture and chromosomal organization. SDS binds hydrophobic protein regions, disrupting tertiary structure and unfolding proteins into extended, denatured polypeptide chains. This comprehensive protein denaturation proves essential for the subsequent separation step.
Action 2: NaOH (The Alkali)
While SDS targets membranes and proteins, sodium hydroxide assaults nucleic acids. NaOH addition elevates lysate pH to extremely alkaline conditions, typically pH 12.0–12.5.
At this extreme pH, the chemical environment becomes incompatible with hydrogen bonds maintaining the DNA double helix:
- Denaturation: Hydrogen bonds between complementary base pairs (G-C and A-T) are disrupted.
- Strand Separation: The double helix unwinds, and complementary DNA strands dissociate.
This process affects all DNA molecules present, but the outcome differs dramatically based on molecular topology—a distinction that forms the entire foundation of alkaline lysis.
The Crucial Difference: Topology Determines Fate
Chromosomal DNA: The bacterial chromosome is an enormous molecule that inevitably undergoes mechanical shearing during violent lysis, producing linear fragments. While termed “fragments,” these pieces remain massive relative to plasmids. Because these fragments are linear (possessing free 5′ and 3′ ends), once hydrogen bonds break, the complementary strands can completely separate and diffuse independently, becoming single-stranded, high-molecular-weight DNA molecules.
Plasmid DNA: Plasmids are comparatively small and, critically, exist as covalently closed circles lacking free ends. When hydrogen bonds break and the helix unwinds locally, the complementary strands separate but cannot escape one another. They remain physically linked—topologically constrained like interlocking chain links. This state of catenated, intertwined strands is the key to selective plasmid recovery.
The Danger Zone: Why Timing Is Critical
Every protocol emphasizes: “Do not incubate for more than 5 minutes.” This is not a guideline—it is an absolute requirement.
Prolonged exposure to high alkaline pH causes irreversible plasmid damage. Extended denaturing conditions eventually overcome topological constraints through a specific mechanism: the strands collapse into a densely tangled, knotted structure of single-stranded DNA termed a “cyclic coil.”
This collapsed conformation is catastrophic for downstream applications:
- It migrates aberrantly fast on agarose gels, appearing as spurious bands that can be mistaken for smaller plasmids or degradation products.
- It resists restriction enzyme digestion because these enzymes require native double-stranded DNA substrates.
- It transforms E. coli inefficiently and produces poor sequencing results.
Therefore, Step 2 constitutes a carefully timed operation. Complete lysis must be achieved to release plasmid DNA, but neutralization (Step 3) must occur before irreversible plasmid damage. Five minutes represents the established safety threshold for this critical balancing act.
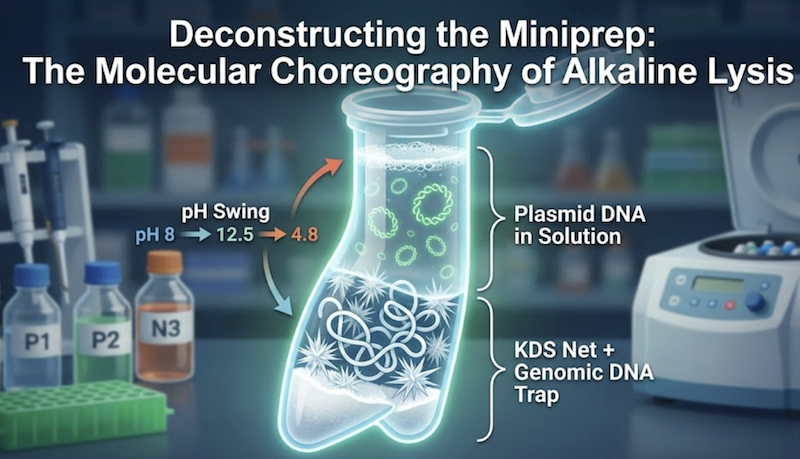
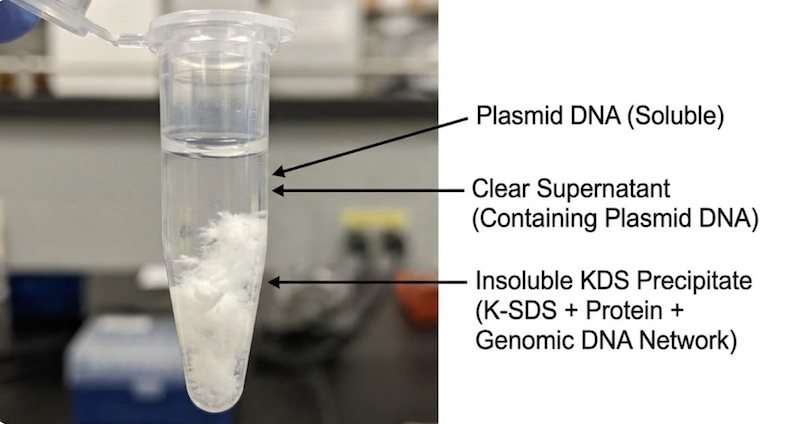
If Step 2 was the “nuclear option,” Step 3 is the precision strike that completes the separation. This is where the magic happens. Upon adding “Buffer N3” (or “Solution III”) to the viscous, clear lysate, the tube instantly fills with a massive, white, flocculent precipitate resembling cottage cheese suspended in liquid.
To the uninitiated, this white mass suggests failure. To the biochemist, it signals perfect chemistry. This buffer typically contains high-concentration potassium acetate (3 M) and acetic acid, adjusted to pH 4.8–5.5. Its addition triggers two simultaneous, dramatic reactions that function as an elegant molecular trap.
Reaction 1: Acidification and Selective Renaturation
The first reaction is driven by acetic acid. Moments earlier, the lysate existed at pH 12.5, maintaining complete DNA denaturation. The acid in Buffer N3 neutralizes the sodium hydroxide, causing pH to plummet rapidly toward neutrality (pH ~7.0).
This sudden pH drop restores thermodynamic conditions favoring Watson-Crick base pairing. Hydrogen bonds between complementary bases (A-T, G-C) become energetically favorable, and separated DNA strands immediately begin searching for their complementary partners to re-establish double-helix structure.
The Winner (Plasmid DNA): Because the two strands of the plasmid remained in close physical proximity through topological interlocking (catenation), they don’t need to search. They are perfectly positioned. As pH drops, they “snap back” into register instantaneously, rapidly reannealing to reform a stable, native, supercoiled DNA molecule.
The Loser (Chromosomal DNA): The situation for genomic DNA is chaotic. The long, linear single strands have diffused apart in the viscous solution. When pH drops, they cannot efficiently locate their original complementary partners among billions of bases. Instead, they pair randomly with partially complementary sequences—forming short, mismatched hybrid regions with neighboring strands. This produces a massive, disordered, cross-linked network of DNA that is both insoluble and structurally aberrant.
Reaction 2: Precipitation (The KDS Effect)
The second reaction creates the visually dramatic white precipitate and involves the detergent, SDS. Until this point, SDS has been denaturing proteins and coating them with negative charge, binding to hydrophobic cores of unfolded proteins and maintaining their solubility in the presence of sodium ions (Na⁺).
Buffer N3 introduces a massive influx of potassium ions (K⁺), triggering a critical ion-exchange event:
- Sodium dodecyl sulfate (Na-SDS) is highly water-soluble.
- Potassium dodecyl sulfate (K-SDS) exhibits dramatically different solubility: it is highly insoluble at cold and even room temperatures.
As potassium displaces sodium, the SDS molecules—and critically, the denatured proteins they’re complexed with—precipitate from solution. This is the white “flocculent mass” forming before your eyes.
.
The Result: The Molecular Net
The brilliance of Birnboim and Doly’s method lies in the synergy between these two reactions. The precipitating K-SDS and denatured proteins form a physical matrix. Simultaneously, the rapidly renaturing chromosomal DNA forms a tangled, insoluble network.
These two insoluble phases interact intimately. The sticky, hydrophobic K-SDS-protein complexes become enmeshed within the tangled web of genomic DNA, creating a massive “chemical net” or clot.
Trapped: This dense precipitate sequesters cell wall debris, denatured proteins, lipopolysaccharides, and the vast majority of chromosomal DNA.
Free: The small, compact, supercoiled plasmid DNA molecules are geometrically excluded. They effectively slip through the pores in this molecular net and remain dissolved in the clear supernatant.
The Critical Balance
This step represents the “make or break” moment for purity. Mixing too vigorously risks fragmenting the genomic DNA precipitate, releasing contaminating fragments into the supernatant. Mixing too gently results in incomplete neutralization, leaving plasmid DNA partially denatured. However, executed correctly—with gentle but thorough inversion—a simple centrifugation pellets the white precipitate, leaving a supernatant containing remarkably pure plasmid DNA.
While modern kits employ silica membrane columns for DNA binding, the upstream chemistry remains identical to the manual method developed decades ago. Here is the classic “textbook” protocol based on Birnboim and Doly, optimized for a 1.5 mL microcentrifuge tube.

1. Harvest & Resuspend
Action: Centrifuge 1.5 mL of overnight bacterial culture. Remove supernatant completely by aspiration or decanting.
Add: 100 µL of Solution I (50 mM Tris-Cl pH 8.0, 10 mM EDTA, 100 µg/mL RNase A).
Technique: Vortex vigorously until the pellet is completely resuspended. No visible clumps should remain—incomplete resuspension leads to inefficient lysis and poor yields.
2. Lysis (The “Do Not Vortex” Step)
Add: 200 µL of Solution II (0.2 N NaOH, 1% SDS).
Technique: Cap the tube and invert rapidly 5–6 times. DO NOT VORTEX. Vigorous mixing will shear chromosomal DNA into smaller fragments that may not precipitate efficiently, contaminating your final preparation.
Observation: The solution should transform from turbid to clear and noticeably viscous as cells lyse and DNA denatures.
Timing: Place on ice immediately. Do not exceed 5 minutes at this alkaline pH, or plasmid DNA may undergo irreversible denaturation into cyclic coils.
3. Neutralization & Precipitation
Add: 150 µL of Solution III (3 M potassium acetate, pH 5.5).
Technique: Invert sharply 5–6 times to ensure thorough mixing.
Observation: A white, flocculent precipitate forms immediately—this is the potassium dodecyl sulfate (KDS) complex entrapping denatured proteins, cell debris, and chromosomal DNA.
Incubation: Place on ice for 3–5 minutes to allow complete precipitate formation and maximize chromosomal DNA entrapment.
4. Clearing the Lysate
Action: Centrifuge at maximum speed (≥12,000 × g) for 5 minutes at 4°C.
Result: Plasmid DNA remains in the clear supernatant. The white pellet contains cellular debris, denatured proteins, and chromosomal DNA. Carefully transfer the supernatant to a fresh tube, avoiding any disturbance of the pellet.
5. Alcohol Precipitation (The Concentration Step)
Add: 2 volumes of ice-cold 100% ethanol (or 0.6 volumes of isopropanol) to the cleared supernatant.
Action: Mix by vortexing briefly. Incubate at room temperature for 2 minutes (or -20°C for 15 minutes for enhanced precipitation). Centrifuge at maximum speed for 5–10 minutes.
Result: A small, often barely visible, glassy pellet of plasmid DNA forms at the bottom of the tube.
6. The Wash
Action: Carefully remove and discard the supernatant. Add 1 mL of ice-cold 70% ethanol.
Purpose: This wash removes residual salts (potassium acetate, SDS) that can inhibit downstream enzymatic reactions. DNA remains insoluble in 70% ethanol, while salts dissolve and are removed.
Spin: Centrifuge for 2 minutes at maximum speed. Remove all ethanol carefully—excess ethanol can inhibit enzyme activity. Air-dry the pellet for 5–10 minutes until no liquid is visible, but do not over-dry (which makes resuspension difficult).
7. Resuspension
Add: 50 µL of TE buffer (10 mM Tris-Cl pH 8.0, 1 mM EDTA) or nuclease-free water. If RNase A was not added earlier, include it at 20 µg/mL.
Technique: Gently pipette up and down to facilitate dissolution. For stubborn pellets, incubate at 55°C for 5 minutes.
Result: You now have purified supercoiled plasmid DNA ready for restriction digestion, sequencing, transformation, or other molecular biology applications.
Almost every alkaline lysis protocol contains this warning in bold, sometimes capitalized letters: “Mix gently by inversion. DO NOT VORTEX.” Why are kit manufacturers so emphatic about this single instruction?
The answer lies at the intersection of physics and chemistry: shear stress. As established, the success of this method fundamentally depends on the vast size difference between plasmid DNA (small, ~3-10 kb) and the bacterial chromosome (massive, ~4,600 kb for E. coli).
When you add Solution II, cells lyse and release their contents. The solution becomes intensely viscous—almost gelatinous—due to liberation of long, uncoiled strands of high-molecular-weight chromosomal DNA. At this critical moment, the DNA is mechanically vulnerable.
Vortexing the lysate during this step applies intense hydrodynamic shear forces that physically fragment the long chromosomal DNA strands into shorter pieces.
The Consequence: If these fragments are sheared to sizes approaching your plasmid dimensions (5–10 kb), they will behave identically to plasmids during subsequent steps.
The Failure: When you add neutralization buffer (Buffer N3), these small linear fragments will not become entrapped in the insoluble KDS-protein network. Instead, they will renature, remain soluble in the supernatant, and co-purify with your plasmid DNA.
The result is a “dirty” preparation. On an agarose gel, this manifests as a smear of genomic DNA throughout the lane, often obscuring distinct plasmid bands. In downstream applications like cloning, transformation, or sequencing, this contamination acts as a competitive inhibitor—reducing efficiency, consuming reagents, and generating confounding background signals.
Armed with chemical understanding of the processes occurring in your tube, you can now diagnose and resolve failures systematically.
Problem 1: Low Yield
Incomplete Resuspension: Did you leave visible bacterial clumps in Buffer P1? Lysis reagents cannot penetrate aggregated cells, leaving a significant fraction of plasmid DNA trapped inside unlysed bacteria.
Incomplete Lysis: Did the solution transform completely clear and viscous after adding Buffer P2? If cloudiness persisted, cell lysis was inefficient. This commonly occurs when bacterial cell density exceeds the buffer’s lysis capacity—using too much culture for the specified buffer volume.
Lost Pellet: The DNA pellet following alcohol precipitation is often glassy, translucent, and loosely adherent. It is notoriously easy to inadvertently aspirate. Always orient your tube with the hinge facing outward in the centrifuge rotor—DNA pellets form on the outer wall, beneath the hinge, allowing you to confidently pipette from the opposite side.
Problem 2: Genomic DNA Contamination
Rough Handling: You likely vortexed or mixed too vigorously after adding Solution II. Repeat: gentle inversion only. Aggressive mixing mechanically shears chromosomal DNA into smaller fragments that escape the precipitation trap.
Extended Lysis Time: Maintaining cells in Solution II beyond 5 minutes can cause non-specific DNA degradation, fragmenting chromosomal DNA into pieces too small to precipitate efficiently with the KDS complex.
Insufficient Cooling: Performing lysis at room temperature rather than on ice can accelerate unwanted nuclease activity and chemical degradation, producing smaller genomic DNA fragments.
Problem 3: Plasmid Resistant to Restriction Enzyme Digestion
Salt/Detergent Contamination: This represents a classic preparative error. You may have omitted the 70% ethanol wash or failed to remove residual ethanol before resuspension. Carryover of SDS or potassium acetate potently inhibits restriction endonucleases—even trace amounts can completely block enzymatic activity.
Irreversible Denaturation: If incubation in Solution II exceeded 5 minutes, the plasmid may have collapsed into “cyclic coils”—tangled single-stranded conformations. This aberrant DNA form cannot be recognized or cleaved by restriction enzymes, producing confusing results where the plasmid migrates at anomalous sizes on gels and remains uncut despite extended incubation with enzymes.
Ethanol Inhibition: Over-dried pellets may be difficult to resuspend, tempting you to add more buffer. Conversely, pellets that retain ethanol will inhibit enzymes. The solution: air-dry pellets only until the ethanol sheen disappears (5-10 minutes), then resuspend promptly.
Problem 4: Poor Transformation Efficiency
Residual Contaminants: Even if your plasmid appears clean on a gel, residual salt, SDS, or ethanol can severely compromise transformation. Always include the 70% ethanol wash and ensure complete removal before resuspension.
RNA Contamination: If RNase A was omitted or inactive, residual RNA can interfere with electroporation and reduce transformation efficiency. Always include active RNase A in Buffer P1 or during final resuspension.
The alkaline lysis method stands as a masterpiece of biochemical engineering. Through orchestrated pH shifts and fundamental salt chemistry, it achieves complex biological separation with remarkable elegance and speed—exploiting the intrinsic physical properties of DNA topology to selectively isolate the genetic vectors we need.
The next time you stand at the bench adding Buffer P2, don’t merely watch the timer. Visualize the hydrogen bonds rupturing simultaneously across millions of DNA molecules. When you add Buffer N3, envision the potassium dodecyl sulfate network capturing cellular debris like a molecular seine, while compact supercoiled plasmids slip through unimpeded. This mental model—understanding mechanism rather than memorizing steps—distinguishes a technician executing a protocol from a scientist commanding a chemical process.
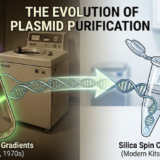
However, our journey through plasmid purification is not complete. We now possess crude lysate containing plasmid DNA, but how do we achieve the “sequencing-grade” purity required for demanding downstream applications? In our next post, we will trace the evolution of purification technology—from the historical cesium chloride density gradient ultracentrifugation that dominated early molecular biology to the elegant silica membrane columns that have become ubiquitous on modern lab benches. We’ll explore the chemistry of selective DNA binding, the physics of membrane chromatography, and the practical strategies for maximizing yield and purity in the final purification step.