
In the 1990s, a quiet revolution transformed laboratory benches worldwide as a generation of molecular biologists became dependent on commercially available chromatography systems—the ubiquitous “miniprep kits” that purify plasmid DNA to near-homogeneity in minutes. Before this era, plasmid purification represented a rite of passage requiring multiple days, hazardous reagents, and comprehensive understanding of physical chemistry. Today, reliance on these kits has become nearly absolute, despite the reality that isolation and purification of plasmid DNA by conventional techniques presents no significant intellectual challenge, and there exists no convincing evidence that traditional plasmid preparations are inferior to those emerging from commercial kits.
The genuine hazard lies in the “black box” phenomenon. When we treat these systems as proprietary magic—employing components whose chemistry remains opaque—we forfeit the critical capacity to diagnose and resolve experimental failures. Why have molecular biologists embraced expensive kits over well-established, published methods using simple, defined reagents? Often, the answer lies in risk aversion combined with relentless marketing campaigns designed to convince researchers that commercial solutions are inherently superior.
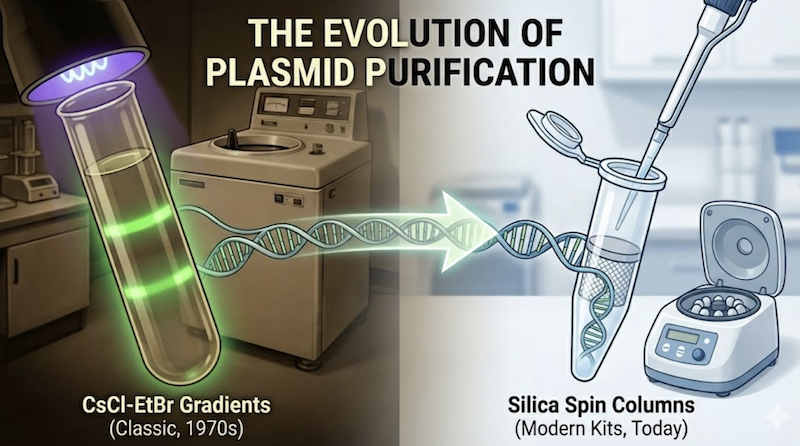
In this installment of Re:Classic, we will dismantle that black box. We will trace the evolution of plasmid purification from the “gold standard” of cesium chloride density gradient ultracentrifugation to the modern silica membrane spin column. By understanding the chemical and physical principles underlying the three-day protocols of the past, you will gain the mechanistic insight required to master—and troubleshoot—the ten-minute protocols dominating contemporary molecular biology.
For decades, equilibrium density gradient centrifugation in cesium chloride (CsCl) with ethidium bromide (EtBr) stood as the gold standard for preparing plasmid DNA. Even today, traditionalists regard plasmids purified by this rigorous technique as the highest-quality material available for demanding applications—particularly biophysical measurements, structural studies, or microinjection into mammalian cells.
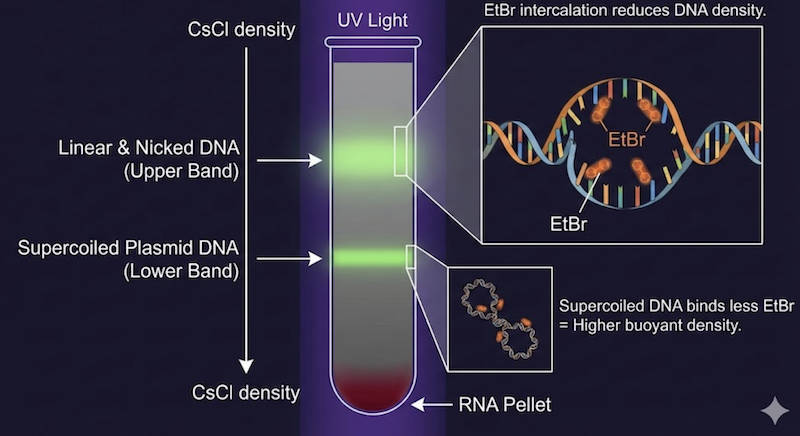
The ability of density gradient centrifugation to separate plasmid DNA from chromosomal DNA—despite both consisting of identical nucleotide building blocks—relies on an elegant interplay between buoyant density and molecular topology. When a concentrated CsCl solution undergoes ultracentrifugation at high speeds (typically 40,000-50,000 rpm), the heavy cesium ions sediment toward the tube bottom, establishing a stable, continuous density gradient. Macromolecules within this gradient migrate to positions corresponding to their intrinsic buoyant density.
However, the true discriminatory power emerges from ethidium bromide addition. This planar, aromatic dye functions as an intercalating agent, inserting itself between stacked base pairs of the DNA double helix. Each intercalation event separates adjacent base pairs by approximately 3.4 Å, partially unwinding the helix and decreasing the density of the resulting DNA-dye complex.
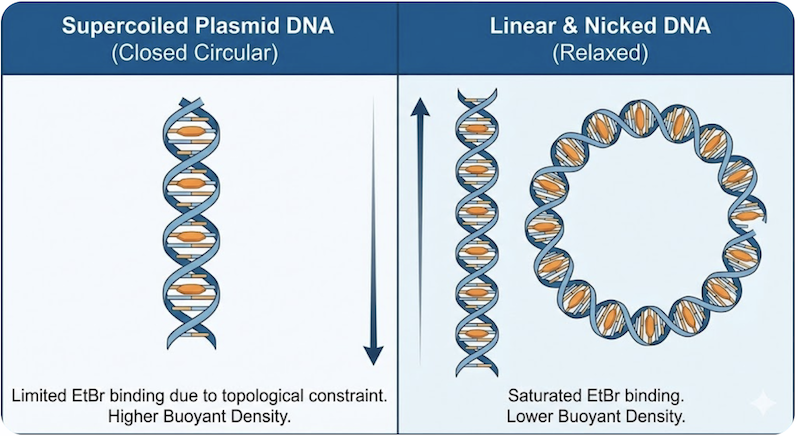
Critically, the extent of this binding depends fundamentally on DNA topology:
Linear and Nicked DNA: Chromosomal fragments and nicked plasmids are topologically unconstrained. As EtBr intercalates, the helix unwinds freely without generating compensatory strain. These molecules continue binding EtBr until approaching saturation (approximately one dye molecule per 2-3 base pairs). Because they incorporate substantial amounts of this relatively “light” organic dye, their effective density decreases dramatically to approximately 1.55 g/cm³.
Supercoiled Plasmid DNA: Native plasmids exist as covalently closed circular molecules under topological constraint. When EtBr intercalates and locally unwinds the helix, the circular molecule must compensate by introducing positive superhelical twists elsewhere to maintain topological invariance. As intercalation continues, accumulating positive superhelical tension increases the energetic cost of binding additional EtBr molecules. Eventually, this topological strain becomes prohibitive, and the molecule reaches a binding saturation point well below that of linear DNA. Because closed circular DNA binds substantially less EtBr, its density decreases less dramatically, remaining at approximately 1.59 g/cm³.
This creates a counterintuitive outcome: the native, biologically functional supercoiled plasmids are denser than degraded or damaged DNA forms, settling into a distinct band below the lighter chromosomal and nicked DNA.
The Classical Workflow
The traditional protocol tested patience and technical skill. Researchers mixed crude alkaline lysate with solid CsCl (to approximately 1.0 g/mL) and EtBr (to 600 µg/mL), sealed the solution in specialized ultracentrifuge tubes, and centrifuged at ultra-high speeds for 16-48 hours at 15-20°C. The extended centrifugation allowed DNA molecules to reach equilibrium positions matching their buoyant densities.
The result was visually striking under UV illumination: linear bacterial DNA and nicked plasmids formed a luminescent upper band, the prized closed circular plasmid DNA occupied a distinct lower band separated by several millimeters, and RNA precipitated as a deep-red pellet at the tube bottom. Experienced researchers could estimate plasmid yield simply by observing band intensity under UV light.
The final step required carefully puncturing the tube sidewall with a syringe to extract the lower plasmid band—a procedure demanding steady hands and spatial precision. The collected fraction then underwent tedious EtBr removal via repeated extractions with water-saturated n-butanol, followed by extensive dialysis to remove residual CsCl. Many senior investigators vividly recall the beautiful deep-pink color of the EtBr-saturated organic waste phase—a visual marker of successful, if hazardous, purification.
While cesium chloride gradients delivered unparalleled purity, the method was undeniably expensive, time-consuming, and required specialized ultracentrifugation equipment. The search for faster, more accessible alternatives led researchers to polyethylene glycol (PEG) precipitation. Pioneered by Lis in 1980 and subsequently refined by investigators including Treisman, PEG precipitation became the standard method for generating “sequencing-grade” DNA in the era preceding commercial kit dominance.
The efficacy of this approach relies on a phenomenon termed macromolecular crowding (or volume exclusion). PEG is a long-chain, water-soluble polymer that, when dissolved at high concentrations (typically 8-13% w/v), occupies substantial solution volume without directly binding nucleic acids. This physical crowding effect reduces the volume available to other solutes, effectively increasing their local concentration and thermodynamically favoring precipitation from solution.
Critically, the PEG concentration required to precipitate DNA is inversely proportional to fragment size—larger molecules precipitate at lower PEG concentrations than smaller ones. By carefully optimizing PEG concentration (typically 10% w/v) and including magnesium chloride (MgCl₂, typically 10-13 mM) as a counter-ion to neutralize DNA’s negative charge, researchers could selectively precipitate large plasmid molecules (>2 kb) while retaining smaller contaminants in solution. These contaminants—short RNA fragments, free nucleotides, oligonucleotides, and very small DNA fragments (<150 bp)—remain soluble and are removed with the supernatant.
The typical workflow involved adding PEG 8000 and MgCl₂ to the cleared alkaline lysate, mixing thoroughly, incubating on ice for 20-30 minutes, and pelleting the precipitated plasmid DNA by centrifugation. A subsequent 70% ethanol wash removed residual PEG and salts, yielding DNA of exceptional purity.
Advantages and Limitations
This method strikes an excellent balance between purity, speed, and cost-effectiveness. It produces DNA sufficiently pure for demanding applications including mammalian cell transfection, automated Sanger sequencing, and most enzymatic manipulations—all without requiring expensive ultracentrifugation infrastructure. The procedure can be completed in 2-3 hours versus the 2-3 days required for CsCl gradients.
However, PEG precipitation has an important limitation compared to its predecessor: it cannot discriminate between topological forms of DNA. Unlike CsCl-EtBr gradients, PEG precipitation does not separate nicked circular plasmids from supercoiled forms, as both possess similar molecular weights and precipitate under identical conditions. Therefore, if your downstream application strictly requires 100% supercoiled DNA—such as for certain biophysical studies, in vitro transcription systems requiring defined topology, or sensitive transformation experiments—the classical CsCl density gradient method remains the gold standard.
For the vast majority of routine molecular biology applications, however, PEG precipitation represented a transformative advance: delivering near-sequencing-grade purity at a fraction of the cost and time investment of ultracentrifugation.
3. The Modern Era: Chromatography and “The Kit
During the 1990s, the laborious era of n-butanol extractions and 48-hour ultracentrifugation runs faded into historical memory as “miniprep kits” revolutionized molecular biology laboratories. These chromatography-based systems transformed what was once a multi-day ordeal into a procedure completable during a coffee break. Yet, while the speed and convenience are undeniable, the compact plastic columns often obscure the sophisticated chemistry occurring within. To truly master these tools—and troubleshoot them effectively—we must examine what happens inside the column.
Chemistry Type A: Silica Matrices (The “Mini-Prep”)
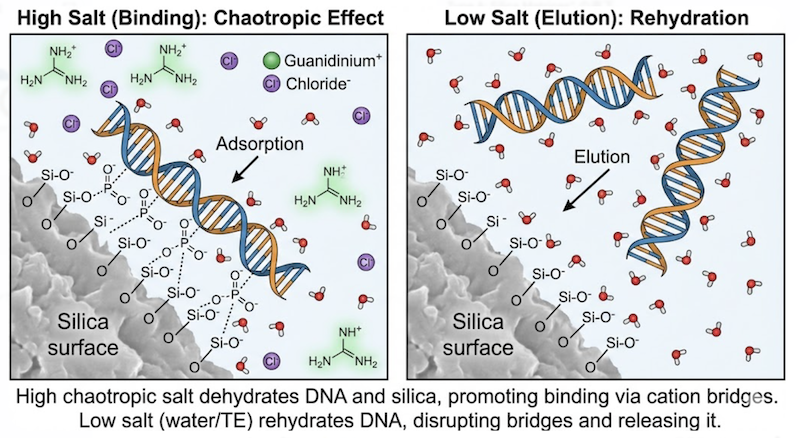
Most routine miniprep kits utilize silica-based solid-phase extraction. The ability of DNA to bind silica represents an elegant chemical phenomenon that has been exploited since the 1950s, relying fundamentally on chaotropic salts such as guanidine hydrochloride (GuHCl) or guanidine thiocyanate (GuSCN).
The Mechanism: The Chaotropic Effect
Under normal aqueous conditions, DNA exists in a heavily hydrated state, with water molecules forming an ordered shell around the negatively charged phosphodiester backbone. Chaotropic salts disrupt this ordered water structure—they are “water structure breakers”—effectively dehydrating the DNA backbone. This dehydration has two critical consequences:
- It exposes the negatively charged phosphate groups, allowing them to interact directly with the silica matrix.
- It neutralizes electrostatic repulsion between DNA and the silica surface (which is also negatively charged under neutral pH conditions).
At high chaotropic salt concentrations (typically 4-6 M guanidine) and slightly acidic pH (pH 6.5-7.5), DNA adsorbs tightly to the silica membrane through a combination of hydrogen bonding and electrostatic interactions mediated by positively charged guanidinium ions acting as salt bridges.
The Purification Workflow:
Once DNA is bound to the silica membrane, the column undergoes washing with ethanol-based buffers (typically 70-80% ethanol with low salt). These washes serve dual purposes:
- They remove contaminants including proteins, lipopolysaccharides, salts, and cellular metabolites, which remain soluble in the ethanol-containing buffer.
- They maintain DNA precipitation on the silica surface, as nucleic acids are insoluble in high-concentration ethanol.
The elution step reverses the binding process. By adding a low-salt, neutral-pH buffer (TE buffer or nuclease-free water, typically 10-50 mM), the chaotropic environment is eliminated, water rehydrates the DNA backbone, and electrostatic repulsion between DNA and silica is restored. The plasmid DNA dissociates from the matrix and elutes into the collection tube as a purified solution.
Advantages: Speed (10-15 minutes total), simplicity (minimal hands-on time), scalability (various membrane capacities available), and safety (no hazardous organic solvents or radioactive dyes).
Limitations: Binding capacity is limited (typically 10-20 µg per miniprep column), and very large plasmids (>20 kb) may show reduced binding efficiency.
Chemistry Type B: Anion Exchange (The “Midi/Maxi-Prep”)
For larger-scale preparations or applications requiring ultra-high purity—often designated “Transfection Grade” or “Endotoxin-Free”—commercial kits typically employ anion-exchange chromatography. Unlike the physical adsorption mechanism of silica columns, this approach relies on precise, reversible electrostatic interactions.
The Mechanism: Electrostatic Binding
Anion-exchange resins are derivatized with covalently attached positively charged functional groups, most commonly:
- DEAE (diethylaminoethyl): Weak anion exchanger with pKa ~9-10
- QAE (quaternary ammonium ethyl): Strong anion exchanger, permanently positively charged at all physiological pH values
The negatively charged phosphodiester backbone of plasmid DNA binds these positive residues through ionic interactions. The strength of this binding is exquisitely sensitive to ionic strength, pH, and the specific buffer composition.
The Purification Workflow:
The process exploits differential binding affinities based on charge density and molecular size:
- Equilibration: The resin is equilibrated with a low-to-moderate salt buffer (typically 600-750 mM NaCl, pH 7.0-8.5). Under these conditions, plasmid DNA binds tightly to the positively charged resin.
- Selective Washing: Contaminating molecules are removed through carefully designed washes:
- RNA, which has lower molecular weight and higher charge density per unit length, binds less tightly and elutes at moderate salt concentrations (~750-900 mM NaCl).
- Proteins, genomic DNA fragments, endotoxins, and metabolites are washed away with intermediate salt concentrations.
- Elution: Plasmid DNA is finally released using a high-salt buffer (typically 1.0-1.25 M NaCl). At this ionic strength, sodium and chloride ions outcompete DNA for binding sites on the resin, disrupting the electrostatic interactions and eluting highly purified plasmid DNA.
Advantages: Superior purity (approaching CsCl gradient quality), excellent endotoxin removal (critical for mammalian cell transfection), scalability (from micrograms to milligrams), and some capacity to separate nicked from supercoiled DNA through optimized elution conditions.
Limitations: More time-consuming than silica-based minipreps (30-60 minutes), requires larger culture volumes, and proprietary resin chemistries prevent easy in-house synthesis of cost-effective alternatives—though “wily chemist colleagues” have occasionally attempted it.
This method is particularly favored for transfection-grade preparations because it yields DNA purity comparable to the classical CsCl method while effectively removing bacterial endotoxins that can trigger inflammatory responses in mammalian cell culture systems.
Even in the era of standardized commercial kits, experiments fail. Columns clog unexpectedly, yields plummet without obvious cause, or transformations yield zero colonies despite seemingly flawless execution. It is precisely in these moments of frustration that “old school” knowledge—accumulated during the era of CsCl gradients and manual extractions—transforms from historical curiosity into an indispensable troubleshooting resource. Here’s how classical wisdom applies to contemporary failures.
The Carbohydrate and Nuclease Menace
One of the most insidious pitfalls involves the intersection of lysis method and bacterial strain selection. While boiling lysis offers speed and simplicity, it is chemically incompatible with certain “classic” strains, particularly HB101 and its derivatives (including TG1 and JM101). When these strains are subjected to the heat and detergents of boiling lysis, they release massive quantities of extracellular polysaccharides and capsular carbohydrates.
In the era of CsCl gradients, these carbohydrates formed a dense, gelatinous band near the supercoiled DNA layer, making clean extraction technically challenging. In modern silica spin columns, these polysaccharides create two distinct problems:
- Physical clogging: The viscous carbohydrate matrix can obstruct the silica membrane, dramatically slowing flow-through or completely blocking the column, resulting in poor yields.
- Chemical contamination: Carbohydrates that pass through co-purify with DNA and potently inhibit downstream enzymatic reactions, particularly restriction digestion and PCR.
Moreover, the boiling method poses a severe hazard when working with endA⁺ strains. The endA gene encodes Endonuclease A, a periplasmic enzyme that degrades double-stranded DNA. Unlike alkaline lysis—which denatures and irreversibly inactivates this enzyme—boiling lysis does not completely denature Endonuclease A. The enzyme copurifies with plasmid DNA and remains dormant until magnesium ions (Mg²⁺) are introduced during restriction digestion. Upon Mg²⁺ addition, the nuclease reactivates and systematically degrades your plasmid, producing confusing gel results showing smears or complete DNA disappearance despite successful purification.
The Solution: For both carbohydrate-producing strains and endA⁺ strains, always employ standard alkaline lysis (Solutions I, II, III), which effectively denatures nucleases and manages polysaccharide contamination. Better yet, use modern recombinant strains (endA⁻, recA⁻) specifically engineered for high-quality plasmid preparation.
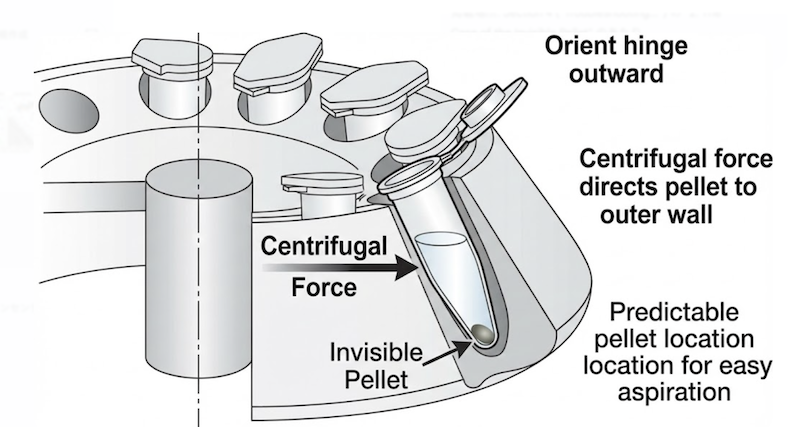
The Case of the Invisible Pellet
Modern protocols frequently conclude with alcohol precipitation to concentrate DNA eluted from columns. However, pure DNA pellets are notoriously translucent—often completely invisible to the naked eye—creating anxiety during supernatant aspiration: “Did I just discard my sample?”
The “old school” solution exploits simple physics. When loading microcentrifuge tubes into a fixed-angle rotor, always orient the plastic hinge facing outward (away from the rotor center). Centrifugal force invariably deposits precipitated material on the outer wall of the tube, directly beneath the hinge. Even if the pellet is microscopic or visually imperceptible, you can be certain of its location.
This knowledge enables confident supernatant removal: position your pipette tip against the inner wall (opposite the hinge) and aspirate slowly along that wall, staying well clear of the pellet zone. This technique has saved countless samples from inadvertent loss.
Additional tip: For critical samples, briefly pulse-spin the tube after the initial supernatant removal, then carefully remove any residual liquid that has collected—this “second pass” ensures complete salt and ethanol removal without pellet disturbance.
Handling Large Plasmids with Care
While commercial miniprep kits prioritize speed, they often employ procedures too aggressive for large DNA constructs. Plasmids exceeding 15 kb—including cosmids, fosmids, BACs (Bacterial Artificial Chromosomes), and PACs—are mechanically fragile and highly susceptible to hydrodynamic shearing.
The vigorous vortexing steps recommended in rapid protocols generate substantial shear forces that can fragment these large circular molecules. Shearing produces linear DNA that migrates aberrantly on gels, transforms inefficiently, and may fail in downstream applications requiring intact circular DNA.
The Solution: For large plasmids, patience and gentleness are essential:
- Eliminate vortexing: Mix all reagents exclusively by gentle inversion—10-15 inversions are sufficient for thorough mixing without mechanical damage.
- Reduce centrifugation speed: Use moderate centrifugation speeds (8,000-10,000 × g) rather than maximum speed to minimize shear during pelleting steps.
- Consider gentle lysis protocols: For extremely large constructs (>50 kb), employ classical gentle lysis methods:
- Resuspend bacteria in isotonic sucrose solution (e.g., 50 mM glucose, 25 mM Tris-Cl, 10 mM EDTA, pH 8.0)
- Add lysozyme (1-2 mg/mL) to digest peptidoglycan, creating osmotically fragile spheroplasts
- Gently lyse spheroplasts with minimal detergent (0.1% Triton X-100 or 0.5% Brij-58)
- This “spheroplast lysis” releases DNA with minimal mechanical stress
- Specialized kits: Several manufacturers now offer kits specifically formulated for large constructs, featuring modified buffers and gentler protocols.
Temperature and Electroporation
If using purified plasmid for electroporation-based transformation, strict temperature control is absolutely critical. Electroporation employs a high-voltage pulse (typically 1.8-2.5 kV) to create transient pores in the bacterial membrane. This process is inherently heat-generating and functions optimally at 0-4°C.
The Problem: If DNA solution, competent cells, or electroporation cuvettes are allowed to warm, solution conductivity increases dramatically. Elevated conductivity during the voltage pulse causes excessive current flow, generating a catastrophic short-circuit termed “arcing.” Arcing manifests as:
- A loud “pop” or “crack”
- Visible flash inside the cuvette
- Immediate temperature spike that kills cells
- Complete or near-complete loss of transformation efficiency
The Solution:
- Maintain cold chain: Keep electroporation cuvettes, competent cells, and DNA solutions on ice continuously until the moment of use.
- Minimize salt: Ensure DNA is resuspended in low-conductivity buffer (10 mM Tris-Cl pH 8.0 or sterile water). Residual salt from purification dramatically increases arcing risk.
- Desalt if necessary: If DNA was eluted in higher-salt buffer, perform ethanol precipitation followed by 70% ethanol wash, then resuspend in low-salt buffer or water.
- Work quickly: After mixing cells and DNA, transfer to the cuvette and pulse immediately—every second of warming increases arcing probability.
- Cell density matters: Overly dense cell suspensions increase conductivity. Follow manufacturer’s recommendations precisely (typically OD₆₀₀ = 0.5-1.0 before washing).
These temperature considerations, though rarely emphasized in modern protocols, represent critical knowledge from the pre-kit era when transformation efficiency directly reflected technical skill rather than kit quality.
It is all too easy to regard the color-coded vials labeled “Buffer P2” and “Buffer N3” in modern kits as proprietary formulations—mysterious potions whose chemistry remains intentionally obscure. However, the moment you recognize that “Buffer P2” is simply the classic sodium hydroxide and SDS solution employed since Birnboim and Doly’s 1979 breakthrough to denature DNA, and that “Buffer N3” is merely acidic potassium acetate formulated to selectively precipitate genomic DNA, the illusion of proprietary magic evaporates—replaced by rational chemistry.
This demystification represents the threshold between competence and mastery.
Understanding why linear DNA binds more ethidium bromide than topologically constrained supercoiled DNA, or how chaotropic salts disrupt water structure to drive DNA adsorption onto silica surfaces, fundamentally transforms your relationship with molecular biology. You transition from a technician executing protocols to a scientist who comprehends the chemical logic underlying each procedural step. When the “black box” of the commercial kit becomes illuminated by mechanistic principles, experimental failures cease being mysterious misfortunes attributable to “bad luck”—they become tractable problems with identifiable chemical causes and rational solutions.
Whether you are conducting a rigorous 3-day cesium chloride density gradient or processing samples through a 10-minute silica spin column, the fundamental objective remains unchanged: obtaining pure, intact, high-quality plasmid DNA suitable for demanding downstream applications. The tools have evolved dramatically across decades—from ultracentrifuges and organic solvent extractions to single-use chromatography columns—but the underlying physical and chemical principles remain eternal and immutable.
Knowledge of these principles is what separates those who are dominated by their experiments from those who command them. This is the true “Biotech Vantage”: the ability to see through the marketing, understand the mechanism, and troubleshoot with confidence when protocols inevitably fail. Armed with this understanding, you are no longer at the mercy of kit manufacturers or cryptic troubleshooting guides. You possess the chemical intuition to diagnose problems, optimize conditions, and adapt protocols to your specific experimental needs.
The next time you open a miniprep kit, don’t just follow the instructions—understand them.